概要
いつもお世話になっている凹みさんの記事を参考にさせてもらってます。
基本的には凹みさんの記事を見ながら、自分の理解やメモを書いているだけの記事となります。
なお、SRPについてはUnityのGithubアカウントから提供されているものをクローンして利用します。
インストールする
まず、上記リポジトリからSRPのプラグインをクローンします。
利用方法についてはちょっとだけ複雑で、GithubのReadmeには以下のように書かれています。
How to use the latest version
Note: The Master branch is our current development branch and may not work on the latest publicly available version of Unity. To determine which version of SRP you should use with your version of Unity, go to Package Manager (Window > Package Manager > Show Preview Packages) to see what versions of SRP are available for your version of Unity Editor. Then you can search the Tags tab of the Branch dropdown in the SRP GitHub for that tag number. To use the latest version of the SRP, follow the instructions below:
This repository consists of a folder that should be cloned outside the Assets\ folder of your Unity project. We recommend creating a new project to test SRP. Do not clone this repo into an existing project unless you want to break it, or unless you are updating to a newer version of the SRP repo.
After cloning you will need to edit your project's packages.json file (in either UnityPackageManager/ or Packages/) to point to the SRP submodules you wish to use. See: https://github.com/Unity-Technologies/ScriptableRenderPipeline/blob/master/TestProjects/HDRP_Tests/Packages/manifest.json
This will link your project to the specific version of SRP you have cloned.
You can use the GitHub desktop app to clone the latest version of the SRP repo or you can use GitHub console commands.
ざっくりまとめると、
- パッケージマネージャを開き、プレビュー版も表示する(
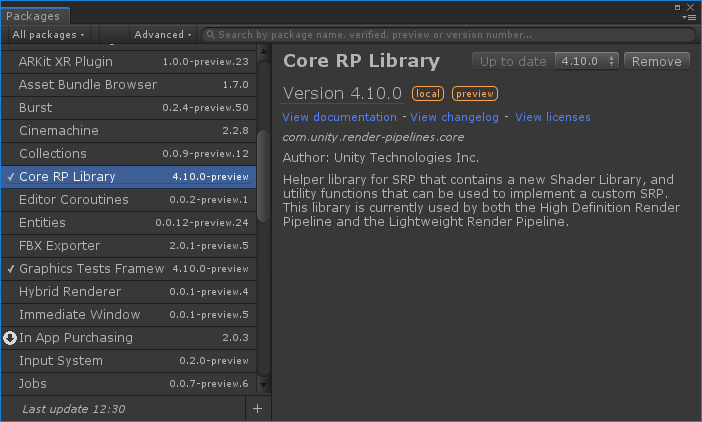
Window > Package Managerを開き、表示されたWindow上部にあるAdvancedをクリックしてShow Preview Packagesを選択) - そこで表示されるSRPの利用可能バージョンを見る(これはUnityのバージョンによって異なるみたい)(※1)
- 利用可能バージョンと同じバージョンが記載されているタグ(Gitのタグ)をチェックアウト
- チェックアウトしたものを、
Assetsフォルダと同階層(かそれより上)に配置する(Assets内には入れない) - Package ManagerのJSONファイルに依存を追記する(※2)
※1 ... 開くとこんな感じのWindowが開き、確認することが出来ます。

※2 ... 依存関係についてはサンプルのJSONが公開されているので参照してください。
ちなみに、サンプルでは"com.unity.render-pipelines.core": "file:../../../com.unity.render-pipelines.core",みたいに書かれていますが、これは適切に、自分で配置したフォルダへの参照となるよう修正が必要です。
Lightweight Pipelineをインストールする
今回は、VR/AR向けに調べてたこともあってLightweight Pipelineのみの説明ですが、インストール自体はLightweight Pipelineの話ですが、High Definition Render Pipelineも基本的には同じです。
SRP自体をインストールしてあれば、同リポジトリに、LWRP用のモジュールも含まれているので、Package ManagerのJSONに依存関係を記載しておけば自動的にインポートされます。
LWRPを利用する
以上でインストールが完了しました。
次に行うのは、実際のレンダリングが、指定のLWRPで実行されるようにセットアップすることです。
Readmeから引用すると以下のように記述されています。
To create a Render Pipeline Asset:
In the Project window, navigate to a directory outside of the Scriptable Render Pipeline Folder, then right click in the Project window and select Create > Render Pipeline > High Definition or Lightweight > Render Pipeline/Pipeline Asset. Navigate to Edit > Project Settings > Graphics and add the Render Pipeline Asset you created to the Render Pipeline Settings field to use it in your project.
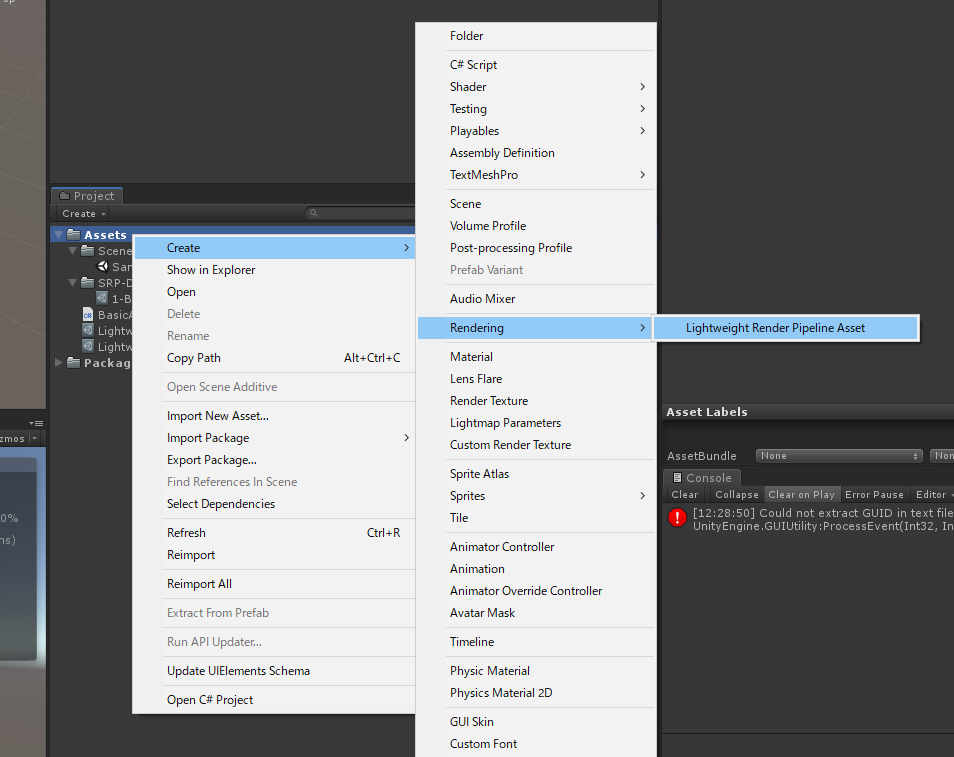
SRPが正常にインストールされていると、Project WindowのCreateメニューにSRP用のメニューが追加されています。

上記のように、メニューから「Lightweight Render Pipeline Asset」を生成します。
そしてEdit > Project Settings > Graphicsから開くグラフィクスセッティングに、上で生成したAssetを設定します。

これでLWRPを利用したレンダリングが行われるようになります。
ただこれを設定するとStandardシェーダが使えなくなるので、LWRP専用のシェーダを利用する必要があります。
LWRP専用シェーダについては別の記事で詳細を書きたいと思います。(というか、まだ現在調査中)
独自のSRPを実装する
LWRPだけ見ていても仕組みは理解できないので、独自のSRPを作って仕組みを把握してみたいと思います。
と言っても、今回は「なにもしない/簡単な処理だけ」のSRPを実装することでSRPがどういうことをやってくれるのかを把握するにとどめます。(というか、まだなにができるかを正確に把握していないので)
「なにもしない」SRP
まず見てみるのは、「なにもしない」SRPの実装です。
やることはただひとつ、グリーンで塗りつぶすだけです。
コードを見てみましょう。
なお、コードはこちらのリポジトリを参考にさせていただいています。
(こちらは公式ブログのデモのようです)
using UnityEngine;
using UnityEngine.Rendering;
using UnityEngine.Experimental.Rendering;

public class BasicAssetPipe : RenderPipelineAsset
{
    public Color ClearColor = Color.green;

#if UNITY_EDITOR
    [UnityEditor.MenuItem("SRP-Demo/01 - Create Basic Asset Pipeline")]
    static void CraeteBasicAssetPipeline()
    {
        var instance = ScriptableObject.CreateInstance<BasicAssetPipe>();
        UnityEditor.AssetDatabase.CreateAsset(instance, "Assets/SRP-Demo/1-BasicAssetPipe.asset");
    }
#endif

    protected override IRenderPipeline InternalCreatePipeline()
    {
        return new BasicPipeInstance(ClearColor);
    }
}

public class BasicPipeInstance : RenderPipeline
{
    private Color _clearColor = Color.black;

    public BasicPipeInstance(Color clearColor)
    {
        _clearColor = clearColor;
    }

    public override void Render(ScriptableRenderContext context, Camera[] cameras)
    {
        // does not so much yet.
        base.Render(context, cameras);

        // Clear buffer to the configured color.
        var cmd = new CommandBuffer();
        cmd.ClearRenderTarget(true, true, _clearColor);
        context.ExecuteCommandBuffer(cmd);
        cmd.Release();
        context.Submit();
    }
}
前述のように、SRPを利用するには、そのパイプラインを記述したAssetを生成してそれをセットすることで実現します。
なので、冒頭ではアセットを生成するEditor向けのクラスが定義されていますね。(↓これ)
public class BasicAssetPipe : RenderPipelineAsset
{
    public Color ClearColor = Color.green;

#if UNITY_EDITOR
    [UnityEditor.MenuItem("SRP-Demo/01 - Create Basic Asset Pipeline")]
    static void CraeteBasicAssetPipeline()
    {
        var instance = ScriptableObject.CreateInstance<BasicAssetPipe>();
        UnityEditor.AssetDatabase.CreateAsset(instance, "Assets/SRP-Demo/1-BasicAssetPipe.asset");
    }
#endif

    protected override IRenderPipeline InternalCreatePipeline()
    {
        return new BasicPipeInstance(ClearColor);
    }
}
RenderPipelineAssetクラスを継承したアセット生成を行う
RenderPipelineAssetクラスを継承した、独自パイプラインのためのクラスを定義します。
RenderPipelineAssetはScriptableObjectを継承しているので、ScriptableObject化してアセットとして保存できるようになっています。
また、RenderPipelineAssetクラスはabstractクラスになっていて、以下のメソッドのみ、オーバーライドする必要があります。
//
// Summary:
//     ///
//     Create a IRenderPipeline specific to this asset.
//     ///
//
// Returns:
//     ///
//     Created pipeline.
//     ///
protected abstract IRenderPipeline InternalCreatePipeline();
中身は、IRenderPipelineを実装したクラスを作れ、ということのようです。
インターフェースはシンプルで、以下のふたつのメソッドを実装するのみとなっています。
//
// Summary:
//     ///
//     When the IRenderPipeline is invalid or destroyed this returns true.
//     ///
bool disposed { get; }

//
// Summary:
//     ///
//     Defines custom rendering for this RenderPipeline.
//     ///
//
// Parameters:
//   renderContext:
//     Structure that holds the rendering commands for this loop.
//
//   cameras:
//     Cameras to render.
void Render(ScriptableRenderContext renderContext, Camera[] cameras);
重要なのはRenderメソッドでしょう。ここで、実際のレンダリングの処理を行うわけです。
参考に上げた実装を見てみると以下のように実装されています。
protected override IRenderPipeline InternalCreatePipeline()
{
    return new BasicPipeInstance(ClearColor);
}
BasicPipeInstanceを、ClearColorを引数に生成したものを返しているだけですね。
IRenderPipelineインターフェースを実装したクラスを作る
ではBasicPipeInstanceのほうの実装も見てみましょう。
public class BasicPipeInstance : RenderPipeline
{
    private Color _clearColor = Color.black;

    public BasicPipeInstance(Color clearColor)
    {
        _clearColor = clearColor;
    }

    public override void Render(ScriptableRenderContext context, Camera[] cameras)
    {
        // does not so much yet.
        base.Render(context, cameras);

        // Clear buffer to the configured color.
        var cmd = new CommandBuffer();
        cmd.ClearRenderTarget(true, true, _clearColor);
        context.ExecuteCommandBuffer(cmd);
        cmd.Release();
        context.Submit();
    }
}
ベースクラスとしてRenderPipelineを継承していますが、RenderPipelineクラスはabstractクラスになっていて、インターフェースに必要な機能の定義と、レンダリング時のイベントをフィールドとして持つようになっているだけのクラスとなっています。
さて、BasicPipeInstanceで重要なのはRenderメソッドですね。
ここを見ればSRPで最低限なにをしないとならないかが分かるはずです。
そこだけを抜き出して見てみましょう。
base.Render(context, cameras);

// Clear buffer to the configured color.
var cmd = new CommandBuffer();
cmd.ClearRenderTarget(true, true, _clearColor);
context.ExecuteCommandBuffer(cmd);
cmd.Release();
context.Submit();
とてもシンプルですね。
コマンドバッファを作り、レンダーターゲットを指定した色(今回の例だとグリーン)でクリアし、それを実行しているだけ、と。
これで画面がグリーンのベタ塗りで表示される、というわけですね。
つまり、コマンドバッファを作ってそこで必要な処理をする、ということのようです。
ちなみに、サンプルではレンダリングごとにCommandBufferを生成していますが、コンストラクタで生成して使いまわしても大丈夫なようです。
不透明オブジェクトだけをレンダリングするSRP
さて、前述のSRPでは背景をベタ塗りするだけのものでした。
そのため、シーン内にオブジェクトがあっても表示されていませんでした。
次は不透明オブジェクトだけをレンダリングするSRPの実装を見てみましょう。
これを見ることで、なんとなくパイプライン全体の流れが把握できるかと思います。
using System;
using System.Collections;
using System.Collections.Generic;
using UnityEngine;
using UnityEngine.Rendering;
using UnityEngine.Experimental.Rendering;

public class OpaqueAssetPipe : RenderPipelineAsset
{
#if UNITY_EDITOR
    [UnityEditor.MenuItem("SRP-Demo/02 - Create Opaque Asset Pipeline")]
    static void CreateOpaqueAssetPipeline()
    {
        var instance = ScriptableObject.CreateInstance<OpaqueAssetPipe>();
        UnityEditor.AssetDatabase.CreateAsset(instance, "Assets/SRP-Demo/2-OpaqueAssetPipe.Asset");
    }
#endif

    protected override IRenderPipeline InternalCreatePipeline()
    {
        return new OpaquePipeInstance();
    }
}

public class OpaquePipeInstance : RenderPipeline
{
    public override void Render(ScriptableRenderContext context, Camera[] cameras)
    {
        base.Render(context, cameras);

        foreach (var camera in cameras)
        {
            // Culling
            ScriptableCullingParameters cullingParams;
            if (!CullResults.GetCullingParameters(camera, out cullingParams))
            {
                continue;
            }

            CullResults cull = CullResults.Cull(ref cullingParams, context);

            // Setup camera for rendering (sets render target, view/projection matrices and other
            // per-camera built-in shader variables).
            context.SetupCameraProperties(camera);

            // clear depth buffer
            var cmd = new CommandBuffer();
            cmd.ClearRenderTarget(true, false, Color.black);
            context.ExecuteCommandBuffer(cmd);
            cmd.Release();

            // Draw opaque objects using BasicPass shader pass
            DrawRendererSettings settings = new DrawRendererSettings(camera, new ShaderPassName("BasicPass"));
            settings.sorting.flags = SortFlags.CommonOpaque;

            FilterRenderersSettings filterSettings = new FilterRenderersSettings(true)
            {
                renderQueueRange = RenderQueueRange.opaque
            };

            context.DrawRenderers(cull.visibleRenderers, ref settings, filterSettings);

            // Draw skybox
            context.DrawSkybox(camera);

            context.Submit();
        }
    }
}
さて、最初のやつよりも少しコードが長くなりましたね。
しかしやっていることは比較的シンプルです。
冒頭ではカリングに関する処理を行っています。
// Culling
ScriptableCullingParameters cullingParams;
if (!CullResults.GetCullingParameters(camera, out cullingParams))
{
    continue;
}

CullResults cull = CullResults.Cull(ref cullingParams, context);
CullResutls.GetCullingParametersによってカメラの状態を評価します。
ドキュメントを見ると以下のように書かれています。
Get culling parameters for a camera.
Returns false if camera is invalid to render (empty viewport rectangle, invalid clip plane setup etc.).
つまり、viwportがemptyだったり、など不正な状態の場合は処理しないようになっています。
そして続くCullResults.Cull(...);によってカリングなどを評価し、実際に表示されるオブジェクトなどの結果を得ます。
ドキュメントによると以下のような結果を得ます。
Culling results (visible objects, lights, reflection probes).
さて、次に行うのはカメラに対するプロパティの設定です。
// Setup camera for rendering (sets render target, view/projection matrices and other
// per-camera built-in shader variables).
context.SetupCameraProperties(camera);
コメントにもあるように、様々な値を設定するようです。
ドキュメントにも以下のように書かれています。
Setup camera specific global shader variables.
This function sets up view, projection and clipping planes global shader variables.
Additionally, if stereoSetup is set to true, and single-pass stereo is enabled, stereo-specific shader variables and state are configured.
プロジェクション行列やクリッピングプレーンの情報など、カメラに必要な設定を行うようですね。
実際にレンダリングを行うコマンドを構築する
以上で設定などの処理が終了しました。
最後に行うのは実際にレンダリングを行うためのコマンドバッファの構築です。
やや長めですが、ざーっと見てみましょう。
// clear depth buffer
var cmd = new CommandBuffer();
cmd.ClearRenderTarget(true, false, Color.black);
context.ExecuteCommandBuffer(cmd);
cmd.Release();

// Draw opaque objects using BasicPass shader pass
DrawRendererSettings settings = new DrawRendererSettings(camera, new ShaderPassName("BasicPass"));
settings.sorting.flags = SortFlags.CommonOpaque;

FilterRenderersSettings filterSettings = new FilterRenderersSettings(true)
{
    renderQueueRange = RenderQueueRange.opaque
};

context.DrawRenderers(cull.visibleRenderers, ref settings, filterSettings);

// Draw skybox
context.DrawSkybox(camera);

context.Submit();
まず冒頭で行っているのは、レンダーターゲットのクリアですね。
このあたりは「グリーンベタ塗り」のときとあまり違いはありません。
その後に行っているのは、レンダリングする対象の絞り込みとその設定です。
レンダリング対象を指定する
DrawRendererSettingsによってどのキューのオブジェクトをレンダリング対象とするかを決め、またどのパス名のシェーダを利用するかも指定しています。
// Draw opaque objects using BasicPass shader pass
DrawRendererSettings settings = new DrawRendererSettings(camera, new ShaderPassName("BasicPass"));
settings.sorting.flags = SortFlags.CommonOpaque;
new ShaderPassName("BasicPass")によってレンダリングするパス名を指定しているのが分かります。今回の例ではBasicPassと名前がついたパスをレンダリング対象としています。
ちょっとシェーダ側の記述を見てみましょう。
Shader "Sample/BasicPass"
{
    Properties { ... }
    SubShader
    {
        Tags { "RenderType" = "Opaque" }

        Pass
        {
            Tags { "LightMode" = "BasicPass" }

            CGPROGRAM
            #pragma vertex vert
            #pragma fragment frag
            #include "UnityCG.cginc"

            struct appdata { ... };

            struct v2f { ... };

            v2f vert (appdata v) { ... }

            fixed4 frag (v2f i) : SV_Target { ... }
            ENDCG
        }
    }
}
細かい処理を除いたサンプルです。
基本的な処理は違いはありません。
違いがあるのは、LightModeにBasicPassと指定されている点にあります。
これは、前述のパイプラインのところで書かれていたnew ShaderPassName("BasicPass")と同じ名前ですね。
つまり、前述のパイプラインではこのパスのみをレンダリングしていた、というわけなんですね。
続く指定処理を見ていきましょう。
FilterRenderersSettings filterSettings = new FilterRenderersSettings(true)
{
    renderQueueRange = RenderQueueRange.opaque
};

context.DrawRenderers(cull.visibleRenderers, ref settings, filterSettings);

// Draw skybox
context.DrawSkybox(camera);

context.Submit();
最後はざーっと見てしまいましょう。
次に行っているのはフィルタリング(FilterRenderersSettings)ですね。
引数は初期化に関するパラメータのようです。ドキュメントには以下のように書かれています。
If initializeValues is true all values are initialized such that no filtering will occur. Otherwise the values are default initialized.
正直ここの変更でなにが変わるのかはまだちょっとよく分かっていません。
が、falseにしたら画面にオブジェクトが表示されなくなったので、基本はtrueでいいのかな、と思います。
さぁ、これで準備が整いました。
あとは実際にレンダリングの処理を記述すれば完成です。
レンダリングにはcontext.DrawRenderers(cull.visibleRenderers, ref settings, filterSettings);を呼び出します。
引数を見ればなんとなく推測できますが、CullResultsによって得られたレンダリング対象と、フィルタ設定を引数にコンテキストのDrawRenderersを呼び出します。
これが、対象オブジェクトのレンダリングを行っている箇所ですね。
そして最後に、context.DrawSkybox(camera);によってスカイボックスが描画されます。
スカイボックスは大抵最後に行われるのでこの位置なのでしょう。
あとはこれをSubmitすれば構築が完了します。
最後に
ベタ塗りだけするSRPと、不透明オブジェクトだけをレンダリングするSRPを見てきました。
どちらも非常にシンプルですが、SRPがどういうことをしてくれる機能なのか、そしてどんなことができるのかはこれでなんとなく見えてきたかと思います。
実際、使用に耐えうるものを構築するにはもっと色々な知識(SRPだけの話ではなく、レンダリングパイプライン全体の話)が必要になるので、イチから構築するというのはあまり現実的ではないかもしれません。
しかし、LWRPを使う際や、既存の仕組みをカスタムする際にはこうした知識は役に立つと思います。
次はLWRPを触ってみて、どんなことができるのか書いてみたいと思います。