Unity Androidのネイティブプラグイン(C++)でOpenGLのテクスチャデータをNativeArrayにコピーする
概要
以前、iOSのネイティブプラグイン側でテクスチャを保存するという記事を書きました。
今回はこれと似た、Androidのネイティブプラグインを作成してテクスチャをコピーする方法について書きたいと思います。
今回の実装にあたり、こちらの記事を大いに参考にさせていただきました。ありがとうございます。
今回実装したものの動作はこちら。(地味すぎてよく分かりませんがw)
よぉぉし、RenderTextureの中身を、Androidのネイティブプラグイン側で取得、コピーすることに成功した。分かりづらいけど、左がRenderTextureの内容で、右がネイティブプラグインでコピーしたテクスチャ。 #Unity #madewithunity pic.twitter.com/qB1QkixFfA
— edom18@XR / MESON CTO (@edo_m18) 2021年11月3日
実際のプロジェクトは以下にアップしてあります。
低レベルネイティブプラグインプラグインインターフェース
低レベルネイティブプラグインインターフェースは、Unityが用意してくれているネイティブプラグインを実装する際に利用できる機能です。この手順に沿って実装することで、各種Graphics APIなどの情報にアクセスすることができるようになります。
凹みさんも過去に記事を公開してくれているので、これ自体に興味がある方は見てみるとより詳しく知ることができると思います。
必要な関数を公開して情報を受け取る
インターフェース、と名前が付いている通り、必要な関数を定義し公開することで、Unity側で適切にデータを受け渡してくれる、というものです。具体的には以下のようにプラグイン側を実装することで、対象プラットフォームのGraphics APIなどに簡単にアクセスすることができるようになります。
static IUnityInterfaces* s_UnityInterfaces = NULL;
static IUnityGraphics* s_Graphics = NULL;

extern "C" void UNITY_INTERFACE_EXPORT UNITY_INTERFACE_API UnityPluginLoad(IUnityInterfaces* unityInterfaces)
{
    LOG_PRINTF("Called a load callback.");

    s_UnityInterfaces = unityInterfaces;
    s_Graphics = s_UnityInterfaces->Get<IUnityGraphics>();
    s_Graphics->RegisterDeviceEventCallback(OnGraphicsDeviceEvent);

    OnGraphicsDeviceEvent(kUnityGfxDeviceEventInitialize);
}

extern "C" void UNITY_INTERFACE_EXPORT UNITY_INTERFACE_API UnityPluginUnload()
{
    s_Graphics->UnregisterDeviceEventCallback(OnGraphicsDeviceEvent);
}
IUnityGraphics インターフェースのヘッダファイルの場所
インターフェースの定義は、例えば以下のような場所に保存されているためそれをコピーして利用します。
C:\Program Files\Unity\Hub\Editor\2019.4.14f1\Editor\Data\PluginAPI
Android Studioプロジェクトを用意
まずはAndroid Studioプロジェクトを用意します。プロジェクト作成はUnityを利用します。
UnityからAndroidStudio用プロジェクトの作成
以下の手順でAndroid Studioプロジェクトを作成します。
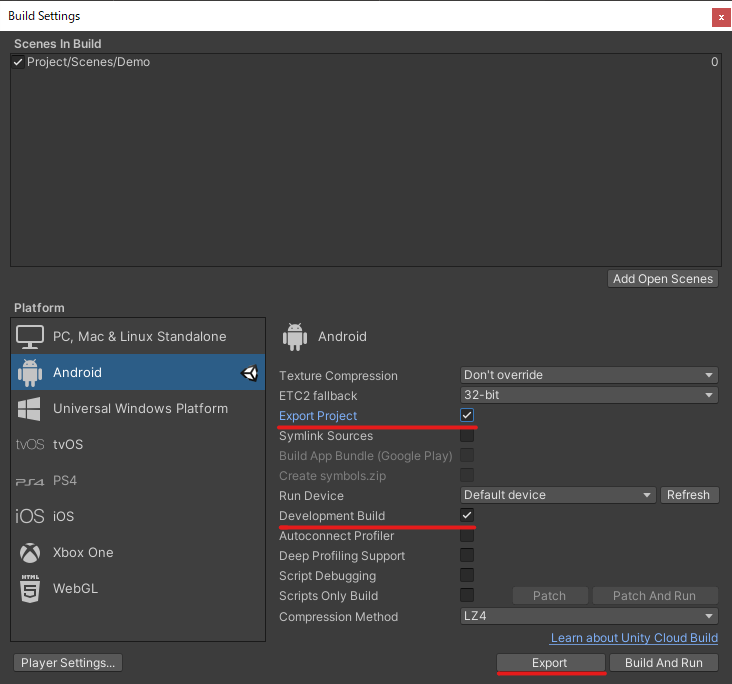
- Unityを起動しプロジェクトを作成する(例:
AndroidPlugin) - AndroidにスイッチしバンドルIDを設定する(例:
com.example.androidplugin) - ExportProject、DevelopmentBuildをチェックしExportを押す
- Unityプロジェクトと同じフォルダにExport用フォルダを作成し、フォルダに移動してから「フォルダの選択」を押す(例:
AndroidPlugin\Android) - AndroidStudio用プロジェクトが生成される
Android Studioを設定する
前段で作成したAndroid Studioプロジェクトを、プラグイン作成用に設定していきます。
Unityプラグイン用のフォルダに、プラグインとなるファイルを追加していきます。作成したプロジェクトをAndroid Studioで開き、プラグイン名( unityLibrary )内に以下のファイルを配置します。
unityLibrary/src/main/内にcppフォルダを作成するcppフォルダ内にCmakeLists.txtファイルを作成する(この時点では中身は空でOK)unityLibraryのコンテキストメニューからLinkC++ProjectWithGradleを選択してリンクする

Android Studio周りのエラー解消
自分の環境ではセットアップ中に色々エラーが出たので解消のために色々調べる必要がありました。これらエラーも環境によって異なると思うので、エラーが出た際の参考にしてください。(出なかった場合はスキップしてください)
ライセンス周りのエラー
以下のようなライセンス周りのエラーが出たのでその解消法です。
Failed to install the following Android SDK packages as some licences have not been accepted.
   ndk-bundle NDK
   patcher;v4 SDK Patch Applier v4
To build this project, accept the SDK license agreements and install the missing components using the Android Studio SDK Manager.
Alternatively, to transfer the license agreements from one workstation to another, see http://d.android.com/r/studio-ui/export-licenses.html

Using Android SDK: C:\Program Files\Unity\Hub\Editor\2019.4.14f1\Editor\Data\PlaybackEngines\AndroidPlayer\SDK
結論から言うと、該当のパッケージなどのライセンスに同意していないというもの。なので、以下の記事を参考に、必要なパッケージをインストールすることでライセンスに同意することができました。
※ ちなみに管理者権限がないと書き込み失敗するので管理者権限でコマンドプロンプトを開始すること。
$ /path/to/AndroidSDK/tools/bin/sdkmanager "patcher;v4"
# 具体的なパス例: C:\Path\To\UnityHub\2019.4.14f1\Editor\Data\PlaybackEngines\AndroidPlayer\SDK\tools\bin\sdkmanager
NDK周りのエラー
NDK周りのエラーが出ていたのでNDKのフォルダパスを適切に設定して解消しました。
NDK is missing a "platforms" directory.
If you are using NDK, verify the ndk.dir is set to a valid NDK directory.  It is currently set to C:\Path\To\Sdk\ndk-bundle.
設定はウィンドウメニューの File > Project Structure... を開き、 SDK Location 内の Android NDK location に設定します。


これでNDKの設定でエラーが解消されましたが、その後さらにいくつかのモジュールインストールでコケていたので、Android Stduioを管理者権限で起動することで解決できました。
IUnityGraphics インターフェースの追加
冒頭で書いた、Unityが用意してくれているインターフェースをプロジェクトに追加します。
前述の PluginAPI フォルダを cpp フォルダにコピーし、 Unity とrenameします。
cppファイルの追加
cpp フォルダ内に、プラグインの実装となるcppファイルを追加します。(例: copy-texture-data.cpp )
最終的に以下の状態になっていればOKです。

CMakeLists.txtを編集
CMakeLists.txt ファイルを編集し、C++プロジェクトをビルドするための準備を行います。具体的には以下のように記載します。(参考にさせていただいた記事から引用させていただいています)
# For more information about using CMake with Android Studio, read the
# documentation: https://d.android.com/studio/projects/add-native-code.html

cmake_minimum_required(VERSION 3.4.1)

# Creates and names a library, sets it as either STATIC
# or SHARED, and provides the relative paths to its source code.
# You can define multiple libraries, and CMake builds them for you.
# Gradle automatically packages shared libraries with your APK.

add_library(# Sets the name of the library.
        native-lib

        # Sets the library as a shared library.
        SHARED

        # Provides a relative path to your source file(s).
        copy-texture-data.cpp)

# Specifies a path to native header files.
include_directories(Unity/)

# Searches for a specified prebuilt library and stores the path as a
# variable. Because CMake includes system libraries in the search path by
# default, you only need to specify the name of the public NDK library
# you want to add. CMake verifies that the library exists before
# completing its build.

find_library(# Sets the name of the path variable.
        log-lib

        # Specifies the name of the NDK library that
        # you want CMake to locate.
        log)

# Specifies libraries CMake should link to your target library. You
# can link multiple libraries, such as libraries you define in this
# build script, prebuilt third-party libraries, or system libraries.

target_link_libraries(# Specifies the target library.
        native-lib

        # Links the target library to the log library
        # included in the NDK.
        ${log-lib}
        GLESv2)
cmake はC/C++プロジェクトをビルドするために利用されるコマンドです。詳細については「cmake cpp build」などで検索してみてください。
プラグインの実装
以上でAndroid Studioの設定が完了しました。ここからは実際にコードを書いてプラグイン部分を作成していきます。
今回は以下のコードを書きました。
#include "IUnityInterface.h" #include "IUnityGraphics.h" #include <math.h> #include <stdio.h> #include <assert.h> #include <GLES3/gl3.h> static GLuint g_textureId = NULL; static int g_texWidth; static int g_texHeight; static void* g_data = NULL; static void UNITY_INTERFACE_API OnRenderEvent(int eventID); #define LOG_PRINTF printf extern "C" bool SetNativeTexture(void* textureId, void* data, int width, int height) { g_textureId = (GLuint)(size_t)textureId; g_data = data; g_texWidth = width; g_texHeight = height; LOG_PRINTF("SetNativeTexture:%d, %d, %d", g_textureId, g_texWidth, g_texHeight); return true; } extern "C" void FinishNativeTexture() { if (g_data != NULL) { delete[] g_data; } g_data = NULL; } extern "C" UnityRenderingEvent UNITY_INTERFACE_EXPORT UNITY_INTERFACE_API GetRenderEventFunc() { return OnRenderEvent; } static void ReadPixels() { int currentFBOWrite; glGetIntegerv(GL_DRAW_FRAMEBUFFER_BINDING, ¤tFBOWrite); glBindFramebuffer(GL_READ_FRAMEBUFFER, currentFBOWrite); glReadPixels(0, 0, g_texWidth, g_texHeight, GL_RGBA, GL_UNSIGNED_BYTE, g_data); } static void UNITY_INTERFACE_API OnRenderEvent(int eventID) { ReadPixels(); }
実装の内容はそこまで多くありません。メインとなる処理に絞って説明していきます。
ネイティブ側にテクスチャポインタおよびデータポインタを渡す
まず最初に見るのが SetNativeTexture 関数です。
extern "C" bool SetNativeTexture(void* textureId, void* data, int width, int height)
{
    g_textureId = (GLuint)(size_t)textureId;
    g_data = data;
    g_texWidth = width;
    g_texHeight = height;

    LOG_PRINTF("SetNativeTexture:%d, %d, %d", g_textureId, g_texWidth, g_texHeight);

    return true;
}
この関数は、C#側からテクスチャポインタとデータポインタが渡され、それを保持します。それぞれ void* 型として渡されます。テクスチャに関してはテクスチャIDに変換して保持しておきます。
g_textureId = (GLuint)(size_t)textureId;
それ以外については static 変数に保持しておきます。
テクスチャからデータを読み出す
次に見るのが ReadPixels 関数です。これが今回のプラグインのメイン部分です。といってもコード量は全然多くありません。
static void ReadPixels() { int currentFBOWrite; glGetIntegerv(GL_DRAW_FRAMEBUFFER_BINDING, ¤tFBOWrite); glBindFramebuffer(GL_READ_FRAMEBUFFER, currentFBOWrite); glReadPixels(0, 0, g_texWidth, g_texHeight, GL_RGBA, GL_UNSIGNED_BYTE, g_data); }
ここで行っているのは、現在アタッチされているFrameBufferからの値を読み出し、データポインタとして渡された位置への書き込みです。
この関数が呼び出される前にC#側でバッファを設定しているので、ここでは GL_DRAW_FRAMEBUFFER_BINDING されているバッファを取得し、それをバインドしています。
そして glReadPixels 関数を呼び出してデータを読み出しています。
ネイティブ側の関数を呼び出す
最後に見るのは OnRenderEvent 関数と GetRenderEventFunc 関数です。ここで行っているのは、C#側から適切に呼び出せるようにするための定義です。細かい説明よりも、C#側のコードを見たほうが早いと思うので、どう使われているかを見てみましょう。
GL.IssuePluginEvent(GetRenderEventFunc(), 1);
GL.IssuePluginEvent はUnityが用意しているAPIで、ネイティブコードプラグインにユーザーが定義したイベントを送信します。端的に言えば、プラグインの関数を呼び出します。
GetRenderEventFunc 関数は関数ポインタを返す関数になっています。つまり、ポインタが示す関数を呼び出している、というわけです。
Pluginをビルドする
C++側の実装が終わったらAndroid StudioでPluginをビルドします。以下の Make Project からビルドを実行します。すると unityLibrary 内に build フォルダが生成されます。そして build/intermediates/cmake/debug/obj/armeabi-v7a/libnative-lib.so の場所にファイルが生成されているので、これをUnityの Plugins/Android フォルダに配置します。

※ 参考にした記事ではGradleのタスクを追加し、それが自動的に Plugins/Android に配置されるようになっていたのですが、実行タスクとして選択できなかったので今回の例では手動でコピーしました。
以上がプラグイン側の実装になります。次はC#側の実装を見てみましょう。
C#側を実装する(プラグインの機能を呼び出す)
まずはコード全文を載せます。その後に、主要部分について説明します。
using System;
using System.Collections;
using System.Runtime.InteropServices;
using Unity.Collections;
using Unity.Collections.LowLevel.Unsafe;
using UnityEngine;
using UnityEngine.UI;

public class CopyTextureData : MonoBehaviour
{
    [SerializeField] private RawImage _rawImage = null;
    [SerializeField] private RawImage _resultImage = null;
    [SerializeField] private int _width = 512;
    [SerializeField] private int _height = 512;
    [SerializeField] private Camera _camera;

    private RenderTexture _renderTexture;
    private Texture2D _result;
    private NativeArray<byte> _nativeArray;

    [DllImport("copytexturedata")]
    unsafe private static extern bool SetNativeTexture(IntPtr textureId1, void* data, int width, int height);

    [DllImport("copytexturedata")]
    private static extern void FinishNativeTexture();

    [DllImport("copytexturedata")]
    private static extern IntPtr GetRenderEventFunc();

    unsafe private void Start()
    {
        _width = Screen.width;
        _height = Screen.height;

        _renderTexture = new RenderTexture(_width, _height, 0, RenderTextureFormat.ARGB32);
        _renderTexture.Create();

        _result = new Texture2D(_width, _height, TextureFormat.RGBA32, false);
        _resultImage.texture = _result;

        _rawImage.texture = _renderTexture;
        _camera.targetTexture = _renderTexture;

        _nativeArray = new NativeArray<byte>(_width * _height * 4, Allocator.Persistent);

        if (!SetNativeTexture(_renderTexture.GetNativeTexturePtr(), _nativeArray.GetUnsafePtr(), _renderTexture.width, _renderTexture.height))
        {
            return;
        }

        StartCoroutine(NativeTextureRenderLoop());
    }

    private void OnDestroy()
    {
        _renderTexture.Release();
        _nativeArray.Dispose();
        FinishNativeTexture();
    }

    private void IssueEvent()
    {
        RenderTexture back = RenderTexture.active;
        RenderTexture.active = _renderTexture;
        GL.IssuePluginEvent(GetRenderEventFunc(), 1);
        RenderTexture.active = back;

        _result.SetPixelData(_nativeArray, 0, 0);
        _result.Apply();
    }

    private IEnumerator NativeTextureRenderLoop()
    {
        while (true)
        {
            yield return new WaitForEndOfFrame();
            IssueEvent();
        }
    }
}
プラグイン側の関数の利用を宣言
プラグインの機能を呼び出すには以下のように宣言します。
[DllImport("copytexturedata")]
unsafe private static extern bool SetNativeTexture(IntPtr textureId1, void* data, int width, int height);

[DllImport("copytexturedata")]
private static extern void FinishNativeTexture();

[DllImport("copytexturedata")]
private static extern IntPtr GetRenderEventFunc();
なお、 DllImport については過去に(英語ですが)記事を書いているので興味がある方は見てみてください。
定義を見てもらうと分かりますが unsafe がついているため、プロジェクトの設定かAssembly Definition Fileなどで unsafe なコードが書けるように設定する必要があります。
ポインタをネイティブ側に渡す
以下のコードが、ネイティブ側にポインタを渡している箇所です。
_nativeArray = new NativeArray<byte>(_width * _height * 4, Allocator.Persistent);
if (!SetNativeTexture(_renderTexture.GetNativeTexturePtr(), _nativeArray.GetUnsafePtr(), _renderTexture.width, _renderTexture.height))
{
    return;
}
Texture クラスには GetNativeTexturePtr() メソッドがあるのでこれを、また NativeArray<T> には GetUnsafePtr() メソッドがあるのでこれを利用してポインタを渡しています。
なお、なぜ NativeArray<T> を使っているかというと、 glReadPixels 関数を実行すると、マネージドメモリの場合にInvalidエラーが出てしまうためです。そのため、 NativeArray<T> を使ってアンマネージドなメモリを確保し、そのポインタを渡しているというわけです。
ネイティブ実装を呼び出してデータをコピーする
最後に、ネイティブ側の実装を呼び出しているところを見てみましょう。
private void IssueEvent()
{
    RenderTexture back = RenderTexture.active;
    RenderTexture.active = _renderTexture;
    GL.IssuePluginEvent(GetRenderEventFunc(), 1);
    RenderTexture.active = back;

    _result.SetPixelData(_nativeArray, 0, 0);
    _result.Apply();
}
上記メソッドを毎フレーム呼び出すことで、冒頭の動画のように、 RenderTexture の内容をコピーしています。
ネイティブ実装側でも書きましたが、 RenderTexture.active に呼び出したい RenderTexture を設定してネイティブ実装を呼び出しています。こうすることでテクスチャからのデータを読み出しているというわけです。
後半部分は実際にデータコピーが成功しているかを示すためのデバッグ処理です。 NativeArray<T> のデータをテクスチャに適用することで確認を行っています。
その他の機能
ちょっと余談として、ネイティブ側でテクスチャ自体にデータを設定する方法を備忘録として残しておきます。
今回の実装ではテクスチャの内容を配列にコピーするというものでしたが、以下はテクスチャ自体に配列のデータを適用するというものです。
glTexSubImage2D(GL_TEXTURE_2D, 0, 0, 0, g_texWidth, g_texHeight, GL_RGBA, GL_UNSIGNED_BYTE, bytes);
なお、 bytes は u_char* 型の配列データです。